Accidentally Deleted iPhone Email? Recover It Quickly!
There's a sinking feeling that accompanies the realization that a crucial email has vanished from your iPhone. Whether it was an accidental tap, a swift swipe, or just a puzzling disappearance, the good news is that retrieving deleted emails on your iPhone is often much simpler than you might think. Before panic sets in, know that your iPhone's Mail app, coupled with your email provider's safeguards, usually provides several layers of protection against permanent data loss.
This comprehensive guide will walk you through the most effective methods to retrieve deleted emails on iPhone, from quick checks within the Mail app to understanding the lifecycle of a "deleted" email. We'll explore where your emails might be hiding, how to search for them, and crucially, how to bring them back to your inbox. The key to successful recovery often lies in acting swiftly, so let's dive in and get those important messages back!
First Line of Defense: Smart Search & The Archive Folder
Sometimes, emails that appear to be gone aren't deleted at all; they're simply misplaced or archived. The native Mail app on your iPhone is equipped with powerful tools to help you locate these seemingly vanished messages. Before you delve into the 'deleted' folders, these initial steps can often provide a quick resolution.
Harnessing the Mail App's Built-in Search
Your iPhone's Mail app includes a robust search function that can scan all your mailboxes for specific keywords. This is incredibly useful if you remember even a small detail about the missing email.
- Open the Mail app: Navigate to the Mail app icon on your iPhone's home screen and tap to open it.
- Reveal the Search Bar: From your inbox list (e.g., "All Inboxes" or a specific account's inbox), pull down slightly from the very top of the screen. A search bar will appear.
- Enter Your Search Terms: Type in any details you remember about the email. This could be the sender's name, part of the subject line, a unique keyword from the email body, or even a date range. As you type, the Mail app will instantly start filtering results.
- Review Results: Carefully scroll through the results. Sometimes, an email might be in an unexpected folder, and the search function will bring it to light.
Pro Tip: Try a combination of keywords. For instance, if you know the sender and a specific project name, combine them in your search for more precise results.
Unearthing Emails from the Archive Folder
Many users confuse archiving an email with deleting it. Archiving is a fantastic way to clean up your inbox without permanently removing messages. If an email isn't in your Trash folder, it might very well be in your Archive.
- Open the Mail app: Launch the Mail app on your iPhone.
- Access Mailboxes: If you're currently viewing a specific inbox, tap 'Mailboxes' in the top-left corner to return to your list of all mailboxes.
- Locate the Archive Folder: Scroll down the Mailboxes list until you find the 'Archive' folder. Tap on it to open. (Note: The name might vary slightly based on your email provider, e.g., 'All Mail' for Gmail users).
- Search within Archive: Once inside the Archive, you can use the same pull-down search function described above to narrow down your search for the specific email.
- Retrieve Your Email: Once found, tap on the email to open it. Then, tap the folder icon (usually a square with an arrow) at the bottom of the screen. Select 'Move Message' and choose your desired destination, typically your primary Inbox, to restore it.
For more specific guidance on these preliminary recovery methods, you might find additional valuable insights in our article on Recover iPhone Emails from Trash, Archive & Smart Search.
The Essential Stop: Your Trash or Deleted Items Folder
When you "delete" an email on your iPhone, it doesn't immediately vanish into the digital ether. Instead, it's typically moved to a temporary holding area – the Trash or Deleted Items folder. This is your primary recovery zone, but remember, items in this folder are usually only kept for a limited time before permanent deletion.
A Step-by-Step Guide to Trash Recovery
Retrieving an email from the Trash folder is one of the most common and successful recovery methods.
- Open the Mail app: Begin by opening the Mail application on your iPhone.
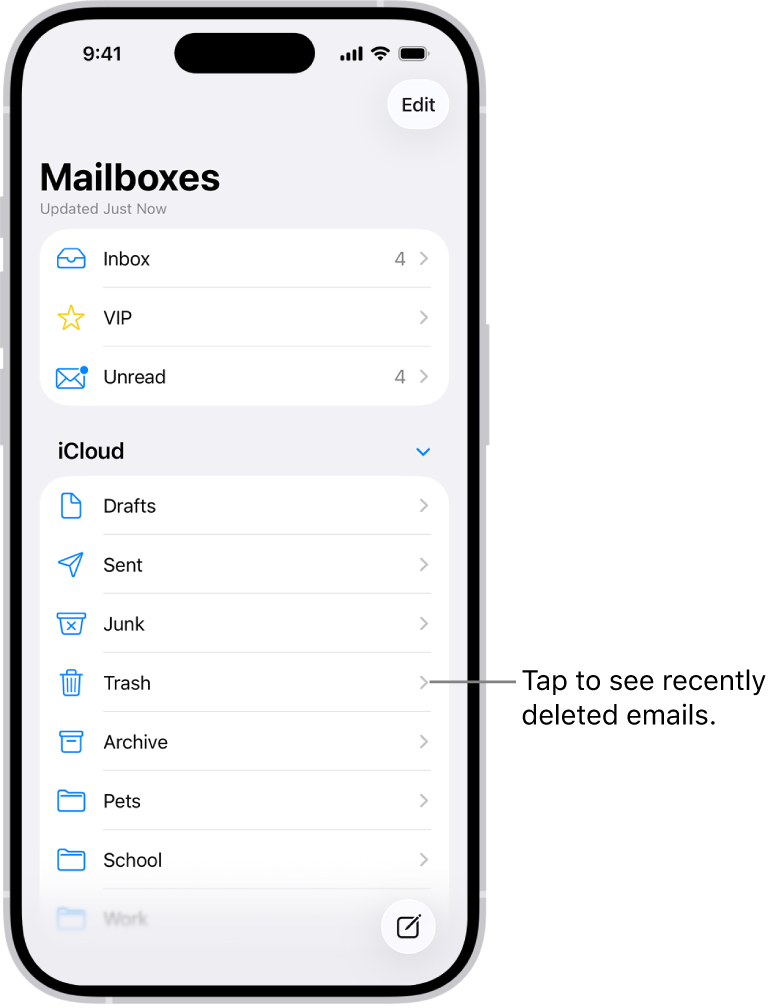
- Go to Mailboxes: If you're in an email's view or a specific inbox, tap the 'Mailboxes' option in the top-left corner to see all your available folders.
- Find the Trash/Bin Folder: Scroll through your list of mailboxes. You'll typically find a folder labeled 'Trash' or 'Bin,' or sometimes 'Deleted Items.' Tap on it to open.
- Locate the Deleted Email: Browse through the emails in the Trash folder. If it's a busy folder, you can use the search bar (pull down from the top) to quickly find the email by sender, subject, or keywords.
- Move the Email Back: Once you've found the email you wish to restore:
- Tap on the email to open it.
- Tap the folder icon (often resembling a square with an arrow pointing upwards or to the right) at the bottom of the screen.
- A list of destination folders will appear. Select 'Inbox' or another preferred folder to move the email back.
Important Note: The duration emails remain in the Trash folder varies by email provider (e.g., Gmail, Outlook, iCloud). Some keep them for 30 days, while others might have shorter or longer retention periods. This is why acting quickly is crucial!
Beyond the Basics: Deeper Dives and Time-Sensitive Recovery
What if the email isn't in your Trash, or you've waited too long? While more challenging, there are still avenues to explore, emphasizing the critical role of timing.
Understanding Your Email Account Settings
Different email providers have varying policies regarding deleted messages. For example, a Gmail account will typically keep emails in Trash for 30 days, while an iCloud account might have slightly different retention. It's often beneficial to log into your email account via a web browser on a computer.
- Check Webmail: Sometimes, an email deleted on your iPhone might still be accessible on the web version of your email service (e.g., mail.google.com for Gmail, outlook.com for Outlook, icloud.com for iCloud Mail). These web interfaces often have more comprehensive recovery options or show items that might have been purged from your device but still exist on the server.
- Server-Side Recovery: Some enterprise email systems have IT departments that can perform server-side recoveries for a limited time, especially for crucial business communications. This is usually a last resort for very important, permanently deleted emails.
The Critical Role of Timing
We cannot stress this enough: act quickly! The moment you realize an email is missing, start your recovery process. Every minute that passes increases the risk of permanent deletion. Once an email is purged from the Trash folder by your email provider's system, it becomes significantly harder, if not impossible, to retrieve.
When All Else Fails: iCloud Backups and Third-Party Tools
For scenarios where an email seems permanently lost, particularly if it was deleted before you had a chance to check the Trash, an iCloud backup *might* offer a glimmer of hope. If you have an iCloud backup from a time *before* the email was deleted, restoring your iPhone from that specific backup could bring the email back. However, this is a drastic measure, as it will revert your iPhone's data to the state of that backup, potentially losing more recent data. Always back up your current iPhone data before attempting this.
Third-party data recovery tools exist, but they are often complex, can be costly, and their effectiveness for email recovery varies. They typically aim to recover data directly from the device's storage before it's overwritten. These should be considered only as an absolute last resort, often requiring technical expertise.
Proactive Measures: Preventing Future Email Loss
While knowing how to retrieve deleted emails on iPhone is essential, preventing accidental deletion in the first place is even better. Here are some tips:
- Use the "Ask Before Deleting" Feature: Some email clients (and potentially future iOS updates) offer an option to ask for confirmation before permanently deleting emails, adding an extra layer of protection.
- Organize Your Mailboxes: Regularly move important emails to specific, well-labeled folders. This not only keeps your inbox tidy but also makes it less likely to accidentally delete an email you need.
- Understand Swipe Gestures: Customize your swipe gestures in Mail settings to avoid accidental deletion. You can set them to 'Archive' instead of 'Trash' by default, or even 'None' for certain directions. Go to Settings > Mail > Swipe Options.
- Regularly Back Up Important Information: While not a direct email backup, regularly backing up your iPhone to iCloud or your computer can protect other vital data. For crucial emails, consider forwarding them to a secondary archive email address or saving them as PDFs.
Conclusion
Accidentally deleting an important email on your iPhone can be a moment of dread, but as this guide illustrates, it's rarely a permanent catastrophe. By understanding the various "safety nets" built into your iPhone's Mail app and your email provider's services, you can efficiently recover most missing messages. Remember to start with the simple checks – the search function and the Archive folder – and then move to the Trash folder. The golden rule is always to act quickly, as the window for recovery is often time-sensitive.
With these strategies in hand, you are well-equipped to manage your iPhone emails with confidence, knowing that a misstep doesn't have to mean permanent loss.