Recovering Lost Emails: Your Comprehensive iPhone Guide
There's a sinking feeling that comes with realizing an important email has vanished from your iPhone. Whether it was a crucial work message, a precious memory, or an essential confirmation, the thought of it being gone forever can be daunting. Thankfully, the native Mail app on your iPhone, alongside your email provider's server settings, offers several robust safety nets. Most "deleted" emails aren't truly gone, but merely misplaced or moved to a different folder. This comprehensive guide will equip you with the knowledge and step-by-step instructions on how to retrieve deleted emails on iPhone, focusing on the powerful features within the Mail app itself – specifically the Trash, Archive, and Smart Search functionalities.
Before resorting to more complex methods, understanding the standard behavior of the iPhone Mail app is key. When you tap the trash icon, you're usually moving an email to a specific folder, not instantly eradicating it from existence. This intentional design gives you a window of opportunity to reverse an accidental deletion, provided you act within the retention period set by your email service. Let's dive into the most common and effective ways to bring those emails back.
The iPhone Mail App's Built-in Safety Nets: Trash and Archive
The first places to check when an email seems to disappear are the designated "holding" folders: Trash and Archive. These are designed to give you a second chance or a systematic way to clear your inbox without permanent deletion.
Checking the Trash/Bin Folder for Recently Deleted Emails
The Trash (or Bin, depending on your region and email provider) folder is the default destination for emails you delete from your inbox. Think of it as your email's recycling bin. Emails usually reside here for a set period—typically 7, 14, or 30 days—before being permanently purged. Acting quickly is therefore crucial.
Here’s how to recover an email from your iPhone’s Trash folder:
- Open the Mail App: Locate and tap the Mail app icon on your iPhone's home screen.
- Access Mailboxes: If you're already in a specific inbox (like 'Primary' or 'All Inboxes'), tap 'Mailboxes' in the top-left corner to return to the main list of all your email accounts and folders.
- Locate the Trash Folder: Scroll down the list of mailboxes. You'll likely see a 'Trash' or 'Bin' folder under each individual email account, or a consolidated 'All Trash' folder. Tap on the relevant Trash folder.
- Find Your Email: Browse through the emails in the Trash folder. If you have many, you can use the search bar at the top to filter by sender, subject, or keywords.
- Recover the Email: Once you've found the email you wish to restore, tap on it to open it. Then, tap the folder icon (often at the bottom of the screen) and select 'Move Message...' Choose your desired destination, typically 'Inbox' or another specific folder, to move it back.
Remember, the longer you wait, the higher the chance the email provider's server will permanently delete the email from this folder. For more detailed recovery strategies, you might find our Retrieve Deleted Emails on iPhone: Complete Recovery Guide helpful.
Unearthing Emails from the Archive Folder
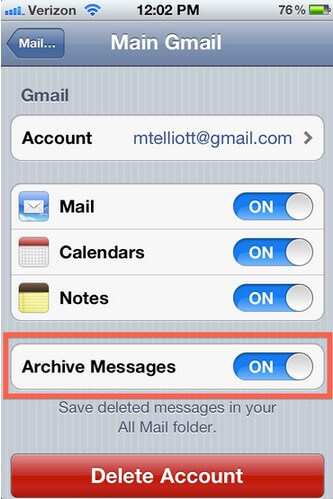
Sometimes, what feels like a deletion is actually an archival. The Archive folder serves a different purpose than Trash; it's a way to move emails out of your main inbox to declutter it, without permanently deleting them. This is especially common if you've set up a swipe gesture to archive emails or if your email client defaults to archiving instead of trashing. Many users accidentally archive emails when they intend to delete them.
To check and retrieve an email from the Archive folder:
- Launch the Mail App: Open the Mail app on your iPhone.
- Navigate to Mailboxes: Tap 'Mailboxes' in the top-left corner if you're not already on the main mailboxes list.
- Select the Archive Folder: Scroll down and tap on the 'Archive' folder. Similar to Trash, there might be individual Archive folders per account or an 'All Archive' folder.
- Search and Locate: Browse or use the search bar within the Archive folder to find the missing email. Input keywords, sender names, or subjects to narrow down results.
- Restore the Email: Once you locate the email, tap to open it. Then, tap the folder icon (move icon) and choose 'Move Message...' Select 'Inbox' or another suitable folder to restore it.
Understanding the distinction between Trash and Archive is crucial for efficient email management and recovery on your iPhone. It's a common oversight, and often, an email you think is deleted is simply resting in the archive.
Mastering Smart Search: Locating Hidden Emails on Your iPhone
What if an email isn't in Trash or Archive? It might not be deleted at all. Emails can get buried under a mountain of new messages, or accidentally moved to a less obvious folder. The iPhone Mail app's search functionality is surprisingly powerful and often overlooked, acting as a "smart search" to pull messages from across all your mailboxes and folders.
Utilizing the Mail App's Universal Search Bar
The Mail app's built-in search allows you to scour all your connected email accounts simultaneously, looking through subjects, senders, recipients, and even the body of the emails. This is incredibly useful for finding messages that might be in an unexpected folder.
Here’s how to use the universal search to find your emails:
- Open the Mail App: Launch the Mail application on your iPhone.
- Reveal the Search Bar: From your inbox list, pull down slightly from the top of the screen. A 'Search' bar will appear at the top.
- Enter Your Query: Type in any details you remember about the email:
- Keywords: A unique word or phrase from the email's content.
- Sender's Name: The name of the person or company who sent it.
- Subject Line: Part of the email's subject.
- Date: You can try searching for specific dates or date ranges (e.g., "yesterday," "last week," "January 2023").
- Review Results: As you type, the Mail app will display results from all your mailboxes, including Trash, Archive, Sent, and even Junk folders. Tapping on a result will take you directly to that email.
This universal search is incredibly effective because it doesn't just look in your current view; it sweeps across all accessible email data on your device. This can often reveal emails that were simply misfiled rather than deleted.
Advanced Search Tips and Filters
Beyond simple keyword searches, the Mail app offers ways to refine your results, making it even more of a "smart" search tool:
- "From: [Sender Name]" or "To: [Recipient Name]": Specify sender or recipient precisely.
- "Subject: [Keywords]": Pinpoint words only in the subject line.
- "Has attachment": Filter for emails with attachments.
- "Unread" or "Flagged": Useful if you remember these states.
- Combined Queries: You can often combine terms, like "From: John Smith Subject: Project Update."
- Search All Mailboxes: Ensure your search isn't limited to a single account. The default pull-down search bar usually covers all accounts, but if you enter a folder and search there, the scope is reduced.
By using these advanced search techniques, you significantly increase your chances of finding any email that still exists on your iPhone or its connected servers. For those situations where you might have Accidentally Deleted iPhone Email? Recover It Quickly! this intelligent search can be a lifesaver.
What If They're Not in Trash, Archive, or Found by Smart Search? Next Steps and Prevention
If you've thoroughly checked the Trash and Archive folders and leveraged the Mail app's powerful search without success, it doesn't necessarily mean all hope is lost. There are a few more avenues to explore, along with crucial steps to prevent future email loss.
Beyond the Mail App: Server-Side Retention and Other Email Clients
The iPhone Mail app is an interface to your email provider (like Gmail, Outlook, Yahoo, etc.). These providers maintain their own servers, and often, their web-based interfaces or dedicated apps offer a slightly longer retention period or more robust recovery options than what's immediately accessible on your iPhone.
- Check Your Email Provider's Website: Log in to your email account through a web browser on a computer or your iPhone. Check the Trash/Deleted Items folder there. Sometimes, emails remain on the server for an extended period even after they've vanished from your device. Providers often have a "recover deleted items" feature that might not be available directly through the iPhone Mail app.
- Dedicated Email Client Apps: If you use a dedicated app for your email service (e.g., Gmail app, Outlook app), check its specific Trash or Bin folder. These apps sometimes sync differently or offer distinct recovery pathways.
- iCloud Mail Recovery: If your email account is an iCloud.com address, Apple offers a specific recovery feature. Log in to iCloud.com, go to Mail, click the gear icon in the sidebar, choose Preferences, then Accounts, and check for a "Recover Recently Deleted" option if available.
It's important to understand that if an email has been permanently deleted from your email provider's server (usually after 30 days in the trash or a manual permanent deletion), recovery becomes significantly more challenging, often requiring advanced data recovery services which are typically outside the scope of simple user actions.
Proactive Strategies: Preventing Future Email Loss
Prevention is always better than cure. By adopting a few smart habits, you can minimize the risk of losing important emails:
- Understand Your "Delete" Action: Be mindful of whether a swipe or tap is set to 'Trash' or 'Archive.' You can customize swipe options in Mail Settings > Swipe Options.
- Regularly Clean Up: Instead of letting important emails get buried, regularly sort, archive, or delete non-essential messages. This makes finding crucial emails much easier.
- Use Flags and Folders: For very important emails, use the Flag feature in Mail or move them into custom folders you create. This provides another layer of organization and ensures quick access.
- Back Up Important Information: For truly critical emails (like legal documents, purchase receipts, or sentimental messages), consider forwarding them to a secondary email address, printing them to PDF, or saving their content to a notes app or cloud storage service.
- Check Server Settings: Familiarize yourself with your email provider's retention policies for deleted emails. Knowing how long emails stay in the trash folder can help you act swiftly when needed.
Conclusion
Losing an email on your iPhone can be a frustrating experience, but as this guide illustrates, there are many effective ways to recover them. By diligently checking your Trash and Archive folders and mastering the Mail app's powerful Smart Search features, you can retrieve most misplaced or accidentally deleted messages. Remember the importance of acting quickly and understanding your email client's settings. With these strategies, you're well-equipped to handle future email mishaps and keep your digital correspondence organized and accessible.